Equipment is the physical DICOM device linked to a resource. This article covers connecting a device to a resource, replacing one, and retiring one.
Everything here requires the Manage organization setup capability.
Why linking matters
Quantivly discovers scanners from the DICOM data they send. An unlinked device is producing data that is not attributed to any resource, so its exams do not appear against a room on the Calendar and do not count toward that resource's metrics.
Linking is what connects the device's data to the schedule position it belongs to.
Connecting a device to a resource
There are two ways in:
Add scanner on a facility — when the room does not exist yet. It walks you through the three steps below: you pick the device, then create or choose the room, then confirm.
Link new equipment on a resource — when the room exists and you are giving it a device. It opens the device list from step 1, showing only devices that room can take. Selecting a device takes you straight to the Confirm & link review in step 3; nothing is linked until you confirm there.
1. Select DICOM source (scanner). A table of DICOM devices sending data but not yet linked, one row per device: institution, station name, modality, make and model, serial number, when it was first and last seen, and its exam count. Search across institution, station, modality, make, model and serial to narrow it, then Select the one you want.
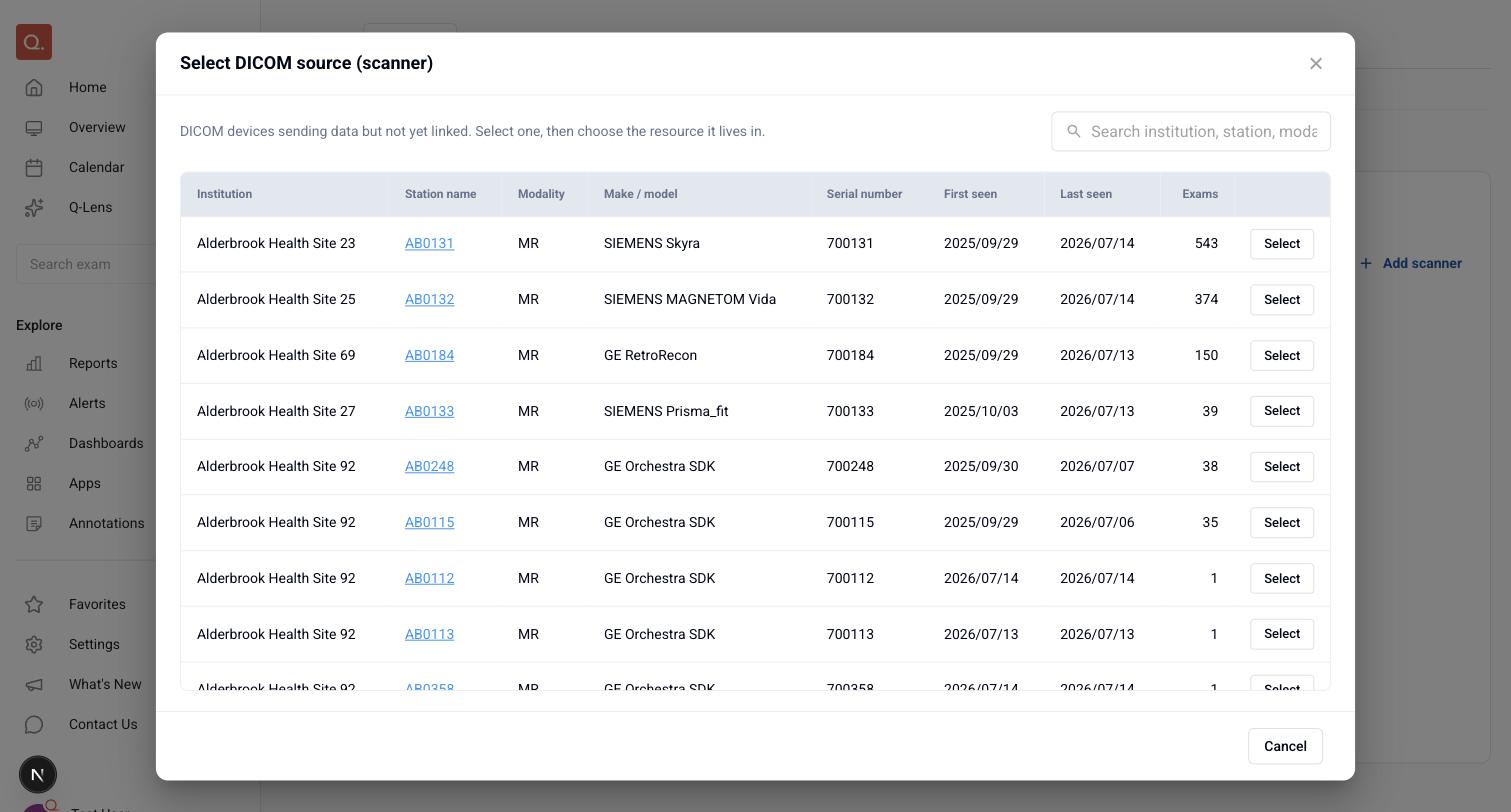
If the list reads "No scanners available." there are no unlinked devices — every device sending data is already attributed.
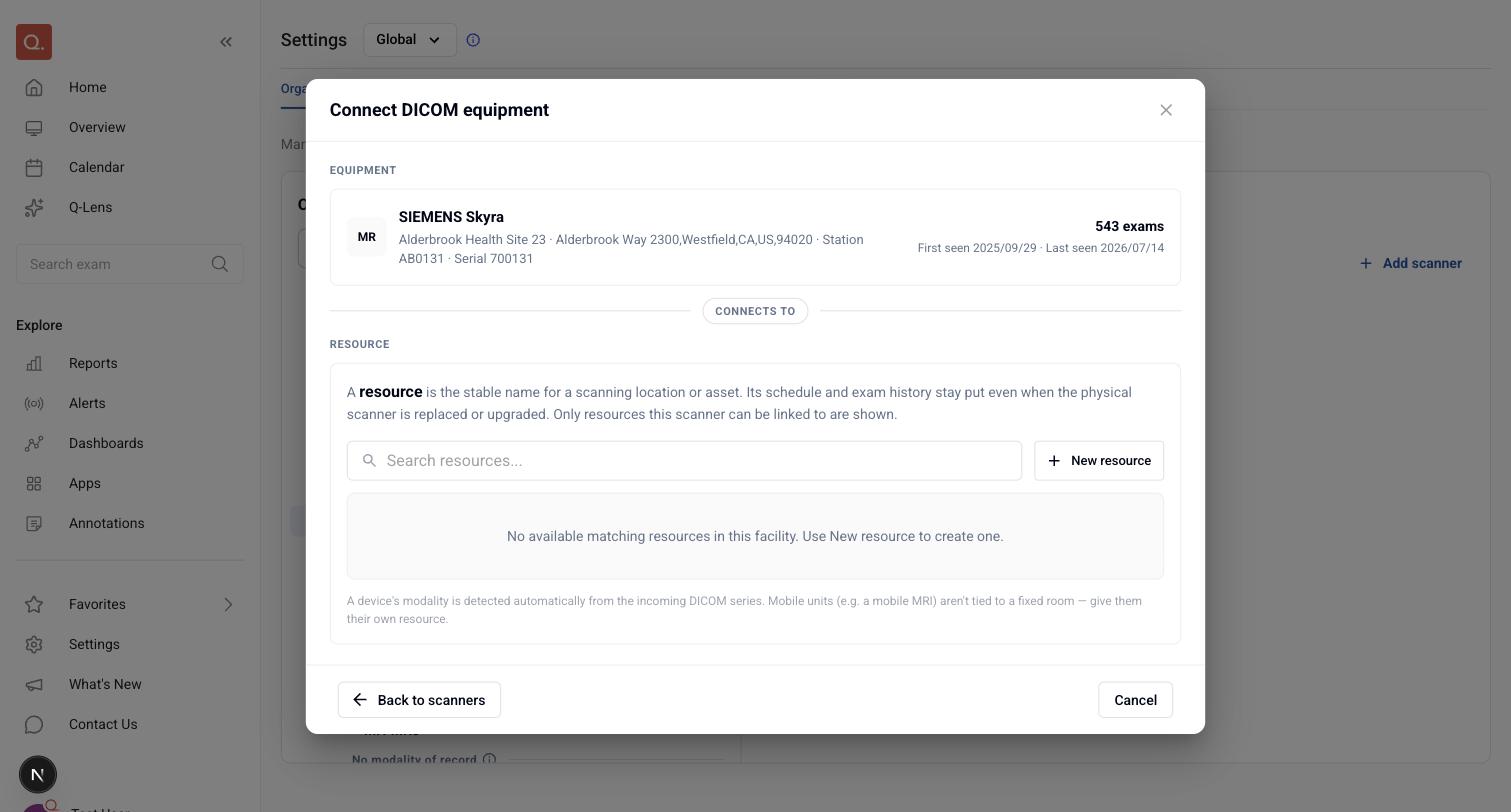
2. Connect DICOM equipment. The device you picked is shown at the top, and below it the resource it will connect to. Search the facility's resources, or use New resource to create one inline — name, short name, care setting and modality of record, with the modality prefilled from the device.
Only resources the device can legitimately link to are offered, so the list may come back empty with "No available matching resources in this facility. Use New resource to create one."
3. Confirm & link. A review screen restates the decision before you commit: "Review before linking. The DICOM source will start feeding data into this resource." It shows three stacked cards:
Card | What it shows |
|---|---|
Location | The institution and facility, as a path |
Resource | The room's name and care setting. A room you created in step 2 is badged NEW |
DICOM source | The station name and modality, the device's institution and address, its make, serial number and exam count, and when it was first and last seen |
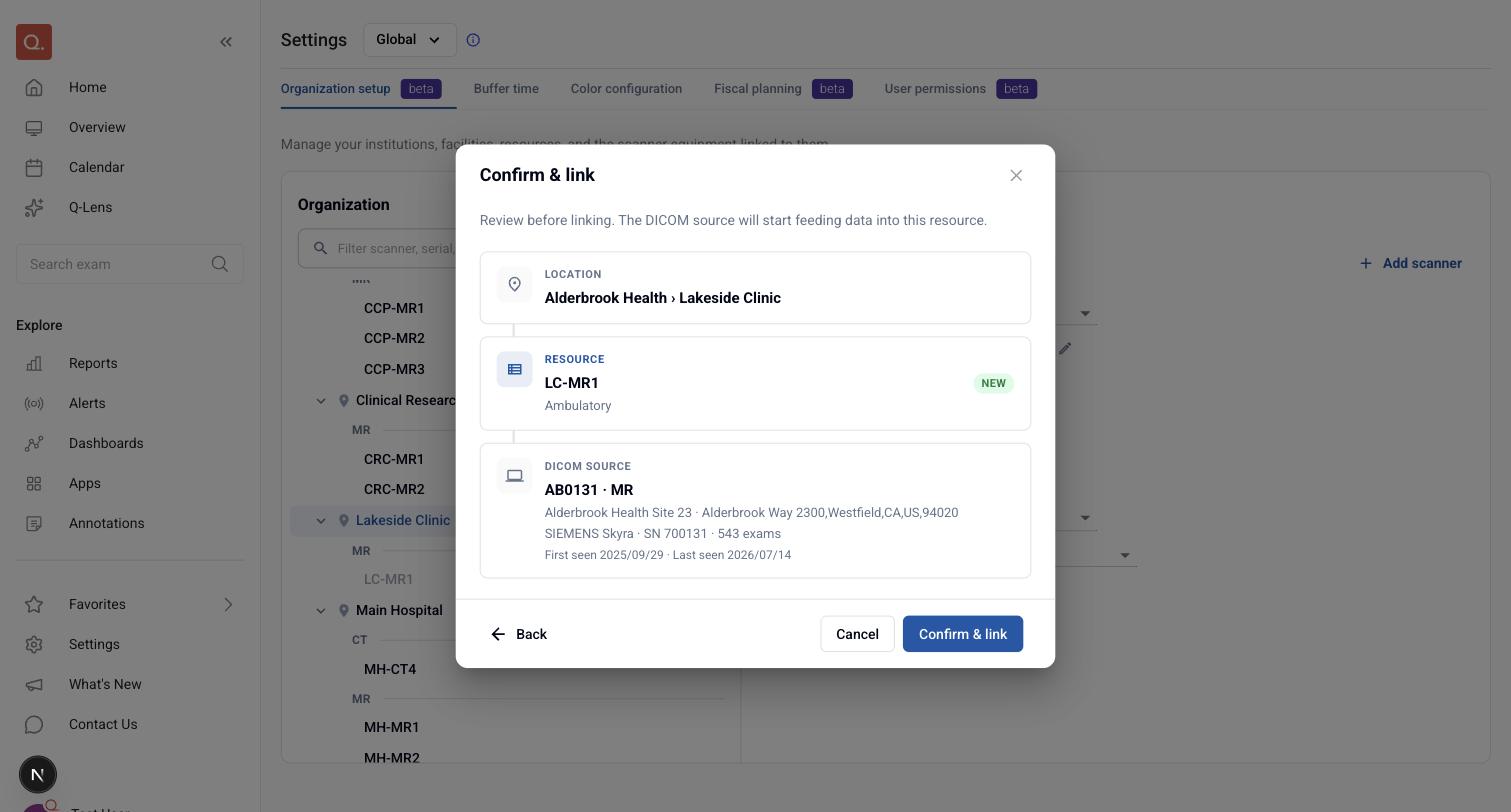
Check the serial number in particular — it is what ties this link to a specific physical unit.
Check the modality too. If the device sends a different modality from the room's modality of record, the review shows a Modality doesn't match warning — for example "CT 1 is recorded as CT, but this scanner sends MR series. Linking it adds those exams to this room's metrics." — and Confirm & link stays disabled until you tick Link it anyway. Once linked, the room is flagged in the tree as receiving data it is not configured for. If it is the room's own modality that is wrong rather than the device, you can correct it on the resource panel instead — see Setting a room's modality of record.
Back returns you to step 2 (or, if you started from Link new equipment, to the device list), and Back to scanners on step 2 returns you to the device list; Cancel abandons the whole thing. The link is made when you select Confirm & link. A room you create with New resource is saved as soon as you select Save, and it stays even if you cancel afterwards.
When a link is refused
Not every resource can take equipment. Linking a device to a resource that is not an imaging resource is refused when you select Confirm & link, and the review shows "Some details are invalid. Correct them and try again." Changing the details will not help in this case: those rooms cannot carry a modality of record either. They are not scanner positions, so there is nothing for a device to attach to — contact your Quantivly team if you expected one to be.
If the room already has a scanner linked, the wizard steps back to the room list so you can choose another room.
Replacing a scanner
To swap the hardware behind an existing schedule position, keep the same resource rather than creating a new one. First use Decommission equipment on the resource (the power icon at the top right of its detail panel); it then shows as Decommissioned and greys out in the tree. Then use Link new equipment on the same resource to connect the replacement, which returns it to Active. The resource keeps its identity, so its Calendar column, its history and its metrics stay continuous across the replacement.
Decommissioning equipment
Decommission equipment retires a device. Both fields are required, and you confirm with Decommission:
Field | Notes |
|---|---|
Decommission date | Picked from a calendar; defaults to today |
Reason | Why is this equipment being decommissioned? |
The reason is stored with the record, so the resource's history explains why the device left service rather than just showing that it did.
Decommissioning removes the device from the resource and marks the resource Decommissioned until you link a replacement; there is no separate step to retire the resource itself.
Past devices are listed under Decommissioned equipment on the resource, each with its decommission date, the reason you gave, and the dates it sent data.
Equipment detail
Open a resource to see its identity fields — the room name, Short name, Care setting and Modality of record are editable here, and the RIS code is shown for reference — and below them a Current scanner panel carrying the device's own details, which are read-only because they come from the data it sends: Modality, Manufacturer, Model name, Serial number, Station name(s), Field strength (MR) or Spatial resolution (CT), and Receiving data since.
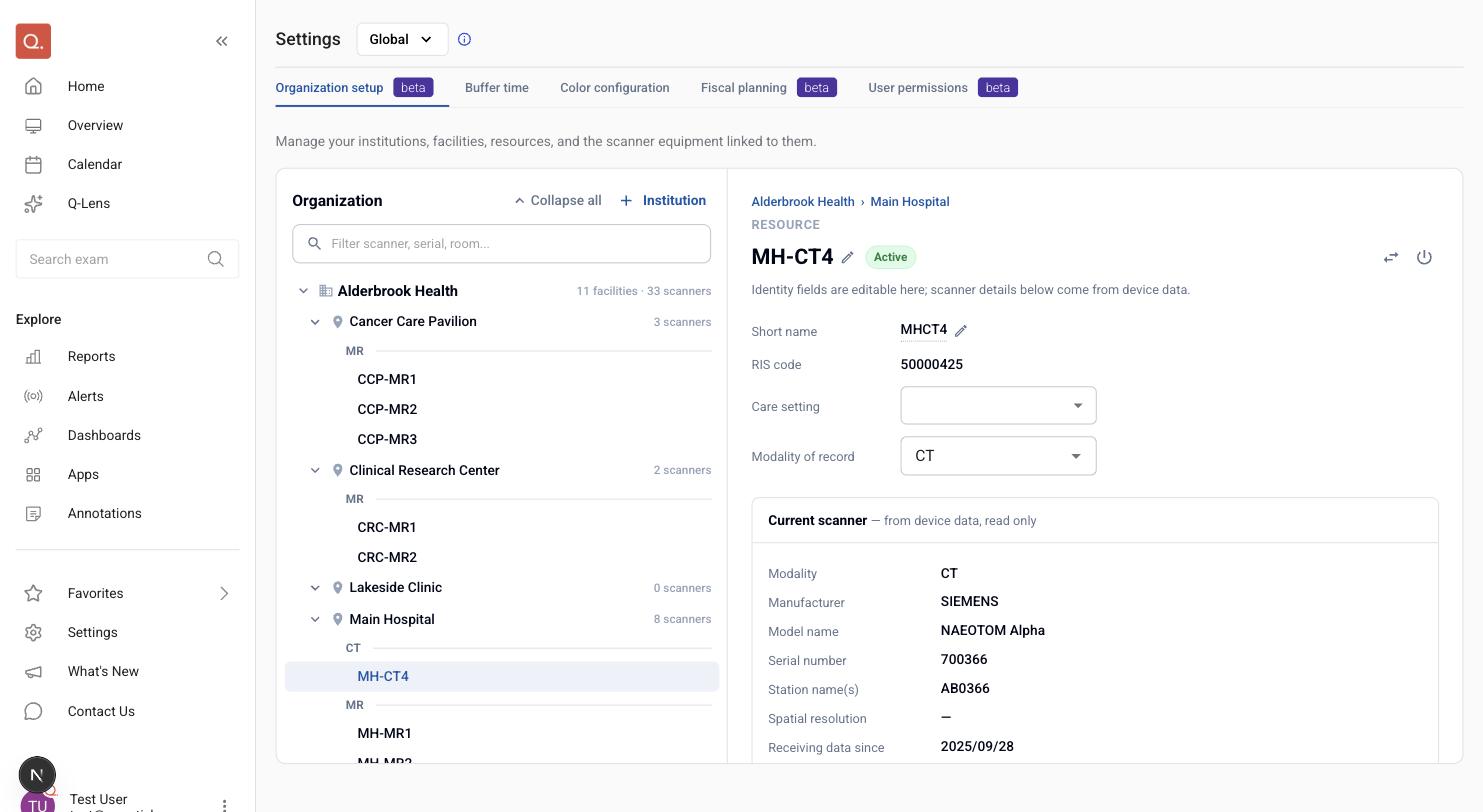
The modality shown under Current scanner is the device's — what it is sending. The room's own Modality of record above it is what decides where the room sits in the tree and on the Calendar, and the two can differ.
Move to another facility (the two-arrow icon) is always available. Decommission equipment (the power icon) appears only while a device is linked, and Link new equipment only when none is. Both icons sit at the top right of the panel; hover one to see its name. The panel shows the resource's current link; a room that has had more than one device linked at once shows only the most recently active of them.
Cards also show modality-specific device characteristics:
Modality | Row shown |
|---|---|
MR | Field strength — for example |
CT | Spatial resolution — for example |
Others | Neither |
On a Decommissioned equipment card for a device that sent both MR and CT, both rows are shown. A value that has not been captured renders as an em dash rather than being hidden, so you can tell "not recorded" from "not applicable".
Dates on these cards, such as Receiving data since, use YYYY/MM/DD.