Settings › Organization setup is where your organization's structure is maintained: manage your institutions, facilities, resources, and the scanner equipment linked to them.
Editing requires the Manage organization setup capability. Without it you can still see the structure: a banner says the page is view-only, the add buttons are disabled, and fields show as plain text.
This article covers the structure itself. For linking scanners to resources and retiring them, see Organization setup: equipment.
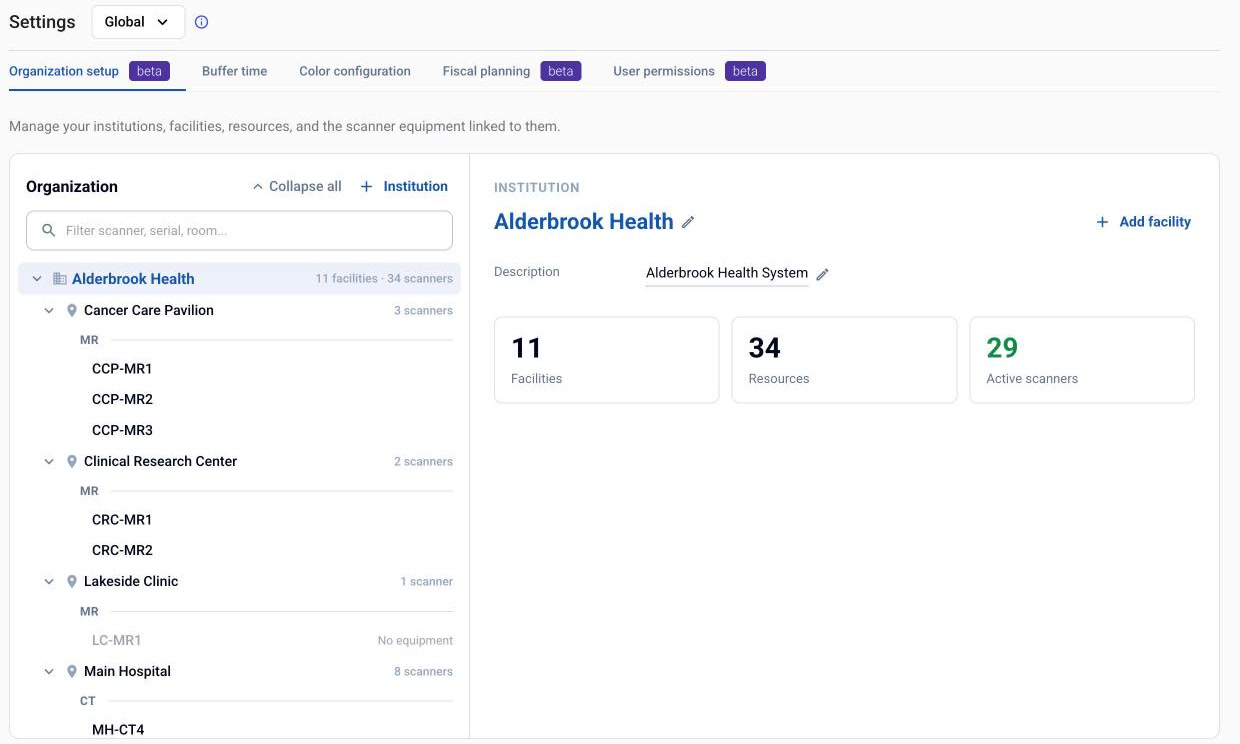
How the hierarchy fits together
Four levels, shown as a tree that opens fully expanded (use Collapse all to fold it). Select any row to see its details on the right; the path above the details is clickable, so you can step back to the parent institution or facility.
Level | What it represents |
|---|---|
Institution | The top-level organization — typically a health system or hospital group |
Facility | A physical site belonging to an institution |
Resource | A scanner position at a facility — the room or slot that appears on the Calendar |
Equipment | The physical DICOM device currently linked to a resource |
A resource is the identity your schedule and history are attributed to; equipment is the hardware fulfilling it right now. Replacing a scanner therefore means linking new equipment to the existing resource, not creating a new resource — which is what keeps the resource's history continuous.
Use the filter box above the tree — Filter scanner, serial, room... — to find rooms by name, short name, RIS code, serial number, make, model or station name. Typing a facility or institution name shows all of its rooms.
Institutions
Select + Institution above the to open Create institution.
Select an institution to see its facilities, or use the detail panel to edit its details.
Facilities
Add facility within an institution opens Create facility. Required fields:
Field | Notes |
|---|---|
Facility name | |
Facility type | Chosen from the types configured for your deployment |
Address line 1 | A second address line is available and optional |
City | |
Country | Chosen from the list |
Time zone | The choices offered follow the country you selected |
State / Province and Postal code are optional.
Time zone matters beyond display: it is the clock your facility's operating hours and schedule are interpreted in.
A facility's own panel also carries Add scanner, which is the quickest way to bring a new room and its device in together — see Organization setup: equipment.
Resources
Select a facility to see its resources. Each resource carries:
A name and an optional short name — the short name is what appears where space is tight, such as Calendar column headers.
A care setting, chosen from your organization's list (for example Ambulatory, Inpatient or Mixed). It can also be left unset.
A modality of record, a status, and a RIS code. The RIS code is shown for reference and cannot be edited here.
Rooms are grouped by modality
Within a facility, rooms are grouped under a heading per modality — the modality the room is, as recorded in its setup, not whatever its linked device happens to be sending. That is the same source Overview and the calendar use, so a room appears in the same place everywhere.
Rooms with none recorded are gathered under a No modality of record heading at the end of the facility. As the heading's info tooltip says, these rooms are left out of modality groupings in Overview and the calendar, so it is worth giving each of them a modality of record.
Setting a room's modality of record
Select the room and use the Modality of record control on its detail panel. It takes more than one modality — tick each that applies and select Apply — which is how a combined room such as a PET/CT is recorded. The modalities you can choose are MR, CT, XR and PET.
A room's record can also hold a modality outside that list, such as US. The control cannot change it, so the panel shows it on a separate Also recorded row (for example Also recorded: US) rather than hiding it. To change one of those, contact your Quantivly team.
Filling in an empty room saves straight away. Changing or clearing a room that already has a modality of record asks you to confirm first, because Overview and the calendar regroup the room's past exams under the new value.
Not every resource can carry one. A resource that is not an imaging resource is refused, with "This resource is not an imaging resource, so it cannot carry a modality of record. Contact your Quantivly team." Those rooms also cannot have equipment linked to them.
Receiving data it is not configured for
A room whose linked device is sending a modality its setup does not declare is flagged in the tree — for example Receiving MR data on a room configured as CT. Hovering names both sides: This room is configured as CT. A linked device is sending MR data.
It usually means the wrong device was linked. Either correct the room's modality of record, as above, or relink the right device — see Organization setup: equipment.
Resource status
Status | Meaning |
|---|---|
Active | Linked to equipment and in service |
No equipment | The resource exists but has no device linked, and its equipment has not been decommissioned |
Decommissioned | Its device was decommissioned. The resource returns to Active when you link a replacement |
Resources that are not in service render greyed out in the tree, so a site's live footprint is legible at a glance.
Moving a resource between facilities
Use Move to another facility on the resource you want to relocate — the two-arrow icon at the top right of the resource's detail panel (hover it to see its name). Move resource lets you pick the destination institution and facility, and the scanner and its decommissioned history move with the room.
Move a resource when the same scanner position changes site — it keeps the resource's identity, and therefore its history, intact. Create a new resource instead when the position itself is new.